eBaghet
Open source electronic pipes project for Arduino-compatible boards.
Currently includes:
- Baghet (Italian bagpipes)
- Great Highland Bagpipes
- Small Pipes
- Border Pipes
- Uilleann Pipes
- Gaita Gallega
- Gaita Asturiana (still in development)
Largely based on eChanter by Tim Malcolm (2010-2015, CC BY-NC-SA).
Audio synthesis is based on the Mozzi sound library.
Sound for the Baghet is provided by Valter Biella.
Hardware build
A step-by-step hardware build guide with photos is included in this repository:
That guide rewrites and updates the most useful ideas from the archived eChanter build notes, adapted to this project and to the documented Nano-based PVC build.
Archived historical reference:
Software requirements
- Arduino IDE or PlatformIO
- Mozzi 2.x (official version)
- For Teensy 4.x builds: the additional Timer and ADC libraries required by Mozzi
Current build status
The project is currently known to compile on:
- Arduino Nano / ATmega328P
- STM32F1 boards with an updated STM32 core
Support for other platforms is being modernized.
Notes about Teensy 4.x
Teensy 4 support is a work in progress.
Mozzi 2 includes Teensy 4 support, but eBaghet still needs platform-specific adaptation for:
- touch input handling
- audio output mode selection
- some hardware-dependent code paths
So Teensy 4 should currently be considered experimental.
Important migration note
Older versions of this project used a personal fork of Mozzi and required manual edits to mozzi_config.h.
This is no longer the recommended setup.
Configuration is now done directly in the sketch with #defines before including Mozzi.h.
Configuration
Open eBaghet.ino and eBaghet_config.h.
Audio configuration
Mozzi settings are now defined in the sketch, for example:
MOZZI_AUDIO_MODEMOZZI_AUDIO_RATEMOZZI_CONTROL_RATE
Typical legacy equivalent values are:
MOZZI_AUDIO_RATE 32768MOZZI_CONTROL_RATE 256
Depending on the board, different audio output modes may be required.
Sample quality
You can enable high resolution samples by defining:
#define USE_16BIT_SAMPLES true
Instrument startup order
You can define the order in which instruments are presented:
	  #define STARTING_INSTRUMENT	GHB
	  #define FIRST_INSTRUMENT	BGT
	  #define SECOND_INSTRUMENT	BRD
	  #define THIRD_INSTRUMENT	SML
	  #define FOURTH_INSTRUMENT	UIL
Where:
GHB= Great Highland BagpipesBGT= BaghetBRD= Border pipesSML= Small pipesUIL= Uilleann pipesGAL= Gaita gallegaAST= Gaita asturiana
Drone startup mode
You can define whether the chanter starts with drone sound enabled:
#define STARTING_DRONES DRONE_ON
or disabled:
#define STARTING_DRONES DRONE_OFF
For the Baghet you can also define the initial drone intonation:
#define STARTING_DRONE_INT DRONE_INT_STANDARD
Available options:
DRONE_INT_STANDARDDRONE_INT_ADRONE_INT_C
Finger sensor type
You can select the fingering sensor type with:
#define TOUCHMODE TOUCH_CAP
Available options are:
TOUCH_CAP= direct capacitive sensingTOUCH_SWITCH= standard pushbuttonsTOUCH_MPR121= external MPR121 capacitive controller
Important note about TOUCH_CAP
TOUCH_CAP is the legacy direct capacitive sensing mode.
It works on supported platforms, but it is hardware-dependent and may require board-specific adaptation.
For new ports, TOUCH_SWITCH or TOUCH_MPR121 are often easier starting points.
Capacitive trigger threshold
If you use TOUCH_CAP, you may want to adjust:
#define CAPTOUCH_TRIGGER 4
Higher or lower values may work better depending on wiring, pads and environment.
Volumes
You can define relative chanter/drone volumes for each instrument, for example:
	  #define GHB_CHANTER_VOLUME	8
	  #define GHB_DRONES_VOLUME	4

	  #define BGT_CHANTER_VOLUME	8
	  #define BGT_DRONES_VOLUME	4

	  #define BRD_CHANTER_VOLUME	8
	  #define BRD_DRONES_VOLUME	8

	  #define SML_CHANTER_VOLUME	8
	  #define SML_DRONES_VOLUME	8

	  #define UIL_CHANTER_VOLUME	8
	  #define UIL_DRONES_VOLUME	8

	  #define GAL_CHANTER_VOLUME	8
	  #define GAL_DRONES_VOLUME	8

	  #define AST_CHANTER_VOLUME	8
	  #define AST_DRONES_VOLUME	8
Values go from 1 (minimum) to 8 (maximum).
Sensor pins
Finger sensor pins are defined in eBaghet_config.h.
Board-specific pin mappings may differ, so check that file and adjust according to your target platform.
Uploading the sketch
- Connect the board
- Select the correct board from the IDE
- Select the correct processor/options if required
- Select the serial port
- Upload the sketch
Startup options
The eBaghet has several startup modes depending on which keys are closed when the chanter is powered on:
- No key closed: starts with
STARTING_INSTRUMENT - High A closed: starts with
FIRST_INSTRUMENT - High G closed: starts with
SECOND_INSTRUMENT - F closed: starts with
THIRD_INSTRUMENT - E closed: starts with
FOURTH_INSTRUMENT - D closed: toggles drones on/off relative to
STARTING_DRONES - C closed (Baghet only): changes drones to A
- B closed (Baghet only): changes drones to C
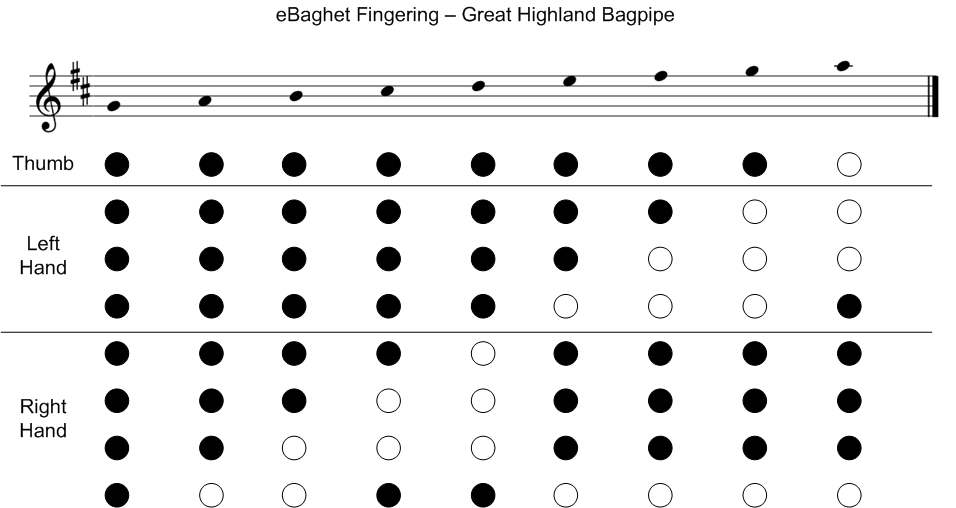
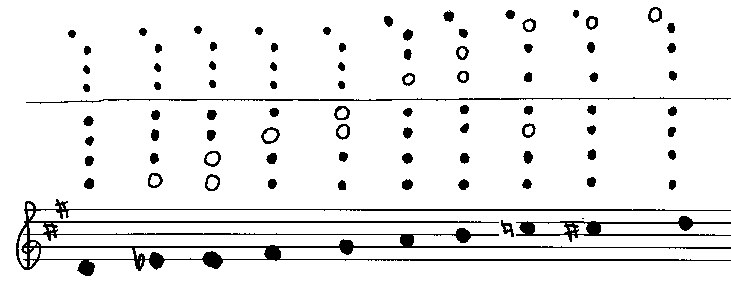
Fingering charts
Great Highland Bagpipes, Border Pipes and Small Pipes:
Uilleann Pipes:
Baghet
(according to the Manuale del Baghet by Valter Biella):
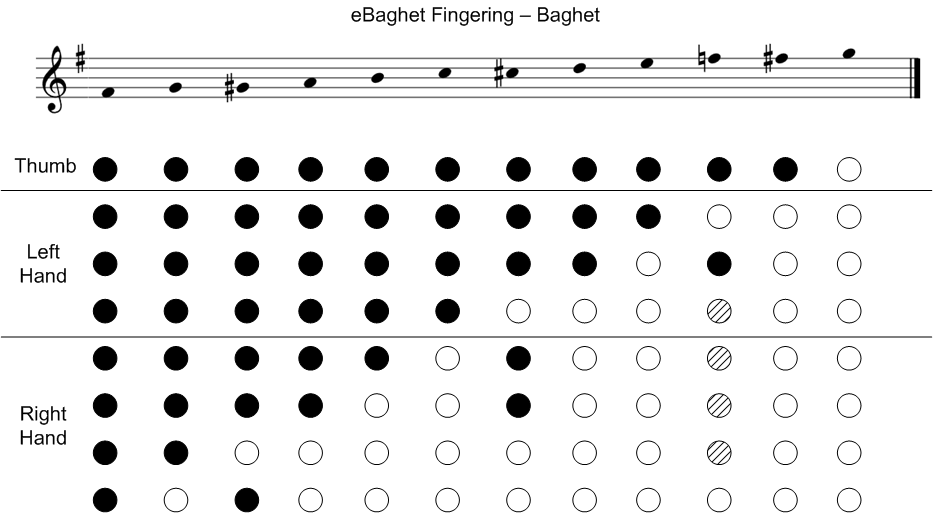
Dashed keys can be open or closed depending on comfort and position.
Roadmap
Planned future work includes:
- ESP32-S3 support
- pressure sensor input
- realistic pitch variation
- I2S audio output
- MIDI output
- Bluetooth MIDI